
The Complete Guide to Work Boot Fit & Sizing (How to Measure, Choose, and Fix Fit Issues)
A poorly fitting work boot doesn’t just hurt—it puts your safety at risk. When you’re standing on concrete for 10-hour shifts, climbing ladders, or navigating uneven terrain, the wrong fit leads to blisters, fatigue, instability, and even long-term foot problems. Yet most workers buy boots based on their sneaker size and hope for the best.
Here’s the modern standard that separates good advice from outdated thinking: new boots should fit well when you buy them. The old “painful break-in” mentality has caused countless workers to suffer through weeks of discomfort—or worse, to keep wearing boots that were never the right size to begin with. Quality work boots today are designed to be comfortable from day one. If a boot causes significant pain out of the box, it’s likely the wrong size, not just “stiff.”
For a broader safety-first overview of work boot essentials, the Work Boots 101 primer ties features to jobsite risks and helps you understand why proper fit matters for workplace protection.
This guide covers everything you need to get work boot fit right:
- How to measure your feet accurately (including the measurement most people skip)
- How to interpret those measurements for different boot types and brands
- How to choose the right size for steel toe, composite toe, and specialty boots
- How to troubleshoot common fit problems like heel slip, toe cramping, and hot spots
Whether you’re buying your next pair or helping your crew get properly fitted, this is the reference you’ll come back to.
Quick Sizing Summary (Read This First)
Before diving into the details, here’s your fast-reference sizing framework.
The 30-second fit target:
- Heel is secure with minimal lift
- Toe room allows wiggle space (thumb-width gap to front)
- Flex point of the boot aligns with your foot’s natural flex point
- No hot spots or pinching anywhere
When to measure:
- Later in the day (afternoon or evening) when your feet are naturally larger
- While wearing your actual work socks—not thin dress socks
The safety boot rule: Apply the +0.5–1cm rule (commonly called the +1cm rule) when buying safety toe boots. This buffer accounts for toe cap space loss, foot swelling during shifts, and thicker work socks.
The most-missed measurement: The heel-to-ball length (also called arch length) from a Brannock device is more important than overall length. This measurement ensures the boot flexes where your foot flexes. Most sizing guides skip it entirely.
Fast decision cues:
- Need more toe room? Try a half size up—but verify the brand actually adds length (some only add width).
- Feeling pinched on the sides? Go wider (D to EE) rather than longer.
✅ Fit Pass/Fail Mini Checklist
Use this quick check before you commit to any work boot:
- [ ] Toe Room: Can you wiggle all toes? Is there a thumb-width gap to the front?
- [ ] Heel Fit: Does the heel feel snug without slipping when you walk?
- [ ] Arch/Flex Point: Does the boot bend where your foot naturally bends?
- [ ] Pressure Points: Any pinching on the sides, top of foot, or toe cap edge?
- [ ] Walk Test: After 5–10 minutes of walking, do any hot spots develop?
Pass all five = proceed with confidence. Fail any = reassess size, width, or boot model.
Most Work Boot Sizing Guides Miss
Most sizing advice online repeats the same basics: measure your foot, check a size chart, done. But three critical factors separate workers who get great fits from those who waste money on returns and suffer through bad boots.
1) The +1cm Rule for Safety Boots (Don’t Guess—Build in Toe Cap + Swelling Space)
Safety toe caps—whether steel, composite, or nano composite—reduce the usable internal space inside the boot. That protective shell takes up room your toes would otherwise occupy. Add to this the reality that feet typically swell during long shifts, especially in warm environments or when standing on hard surfaces.
The practical rule: Start from your accurately measured length, then add a 0.5–1cm buffer (the +1cm rule) specifically for safety-toe work boots. This is especially important if you wear thicker work socks.
Use this as your starting point, then confirm with the fit checks described later (toe room test + insole method). The buffer isn’t about buying loose boots—it’s about accounting for the space the safety toe steals.
2) Heel-to-Ball (Arch Length) Matters More Than Heel-to-Toe Length
Here’s what most guides get wrong: they focus entirely on overall foot length. But boots must flex where your foot flexes. If the boot’s built-in flex point doesn’t align with your foot’s ball/arch position, you’ll experience discomfort even if the toe room seems perfect.
Think of it this way: your foot has a natural hinge point at the ball. The boot has a designed flex point built into its construction. When these don’t match, every step fights against the boot’s structure.
Priority order for work boot fit:
- Arch length alignment (heel-to-ball match)
- Toe room
- Width and volume fine-tuning
3) In Some Brands, Half Sizes Add Width (Not Length)—So Your “Half Size Up” Strategy Can Fail
This is the sizing secret that catches experienced boot buyers off guard. Some work boot manufacturers use half sizes primarily to increase width and volume while keeping length nearly the same.
That means your go-to strategy of “half size up for more toe room” might not actually give you more toe room. Instead, you’ll just get a boot that’s roomier on the sides and instep—which may or may not solve your problem.
The fix: Before assuming a half size up will work, verify whether that specific brand’s half sizes change length or width-only. If you genuinely need more toe room but the half size only adds width, you may need to go a full size up or try a different model with a roomier toe box.
Before You Measure: The Setup That Prevents Wrong Sizes
Accurate measurements start before you pick up the ruler. These setup steps prevent the most common sizing errors.
Measure at the Right Time (Swelling Matters)
Your feet are smallest in the morning and largest in the late afternoon or evening. Since you’ll be wearing your boots during long shifts when your feet are swollen, measure later in the day to capture your feet at their working size.
Also critical: measure both feet. Most people have one foot slightly larger than the other. Always use the measurements from your larger foot when making sizing decisions. Buying for the smaller foot guarantees discomfort.
Wear the Socks You’ll Actually Work In
Sock thickness directly impacts how boots fit. A boot sized while wearing thin dress socks will feel too tight once you switch to thick work socks or safety socks with cushioning.
Before measuring:
- Put on the exact socks you’ll wear on the job
- If you use moisture-wicking liners under wool socks, wear both layers
- If your sock thickness varies by season, measure with your thickest option
The difference between thin and thick socks can equal a half size or more—don’t underestimate it.
What You’ll Need (At-Home Kit)
For accurate at-home measurements, gather:
- Measuring tape or ruler (metric and imperial)
- Two sheets of paper larger than your feet
- Pencil or pen
- A wall with a flat floor in front of it
- Your work socks
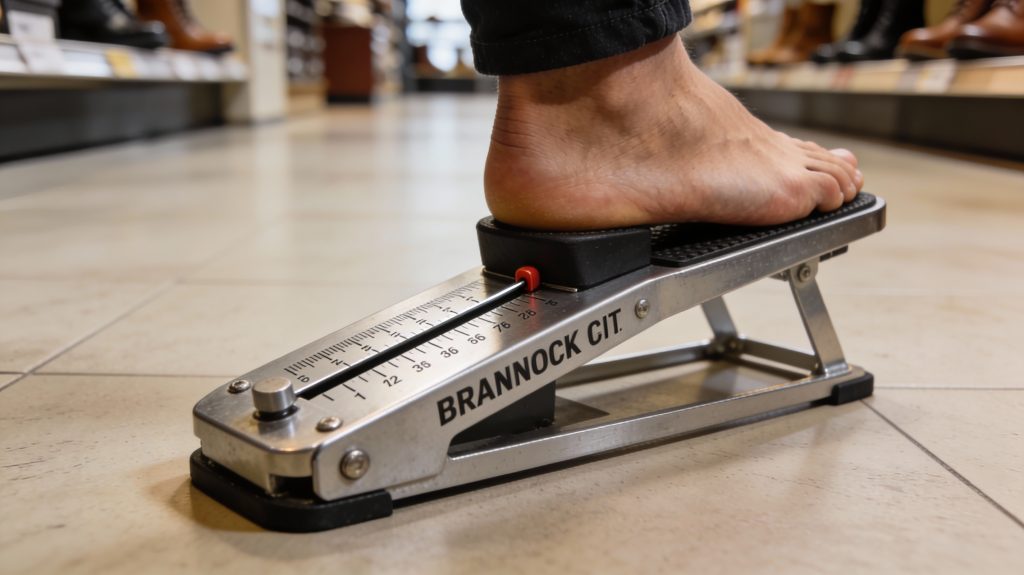
Optional but better: Visit a store with a Brannock device—the metal foot-measuring tool you’ve seen at shoe stores. It captures length, width, and arch length in one reading. Many work boot retailers and safety equipment suppliers have them.
Emerging option: Some retailers now offer 3D foot scanning technology that captures your foot’s complete dimensions digitally. These services are becoming more common and can identify fit issues that manual measurements miss. We’ll cover this in detail later.
How to Measure Your Feet for Work Boots (Step-by-Step)
Follow these steps for each foot, then use the larger foot’s measurements for sizing decisions.
Step 1 — Measure Length (Heel-to-Toe)
Wall method:
- Place a sheet of paper against a wall on a hard, flat floor
- Stand on the paper with your heel touching the wall
- Keep your weight evenly distributed (don’t lean)
- Have someone mark the tip of your longest toe with a pencil held straight down
- Measure from the wall edge to the mark
Tracing method (alternative):
- Stand on paper with your full weight on the foot
- Trace around your foot, keeping the pencil vertical
- Measure from the heel line to the longest toe
Record in both cm and inches for easier conversion to different sizing charts. Repeat for the other foot.
Step 2 — Measure Width (Forefoot Width)
Width measurement targets the widest part of your foot—typically across the ball, where your foot is broadest.
To measure:
- While standing with weight on the foot, identify the widest points (usually the joints at the base of your big toe and little toe)
- Measure straight across from the outer edge of one to the outer edge of the other
- Record in cm and inches
Important note: Width and “volume” aren’t identical. Width is the side-to-side measurement, but volume includes depth (how high your foot rises). A wide foot isn’t necessarily a high-volume foot. We’ll address volume later.
Step 3 — Measure the Measurement Most People Skip: Heel-to-Ball (Arch Length)
This is where a Brannock device excels—it has a specific scale for arch length (heel-to-ball measurement). If you’re measuring at home, here’s the best proxy:
At-home arch length method:
- While standing on your traced outline, identify the ball of your foot (the widest part, where your foot bends)
- Mark this point on the tracing
- Measure from your heel to this mark
This measurement tells you where your foot’s flex point is located. Arch length is more important than total length because the boot must flex where your foot flexes. A mismatch creates discomfort, even if total length seems correct.
If your arch length measurement suggests a different size than your heel-to-toe measurement, prioritize arch length.
Step 4 — Convert Measurements to Boot Size
Use your measurements to find a starting size on the brand’s sizing chart:
- Compare your heel-to-toe length to the chart’s length column
- Check your width measurement against width guidelines
- If the brand provides arch length sizing (rare but valuable), use it
If you fall between sizes:
- Leaning toward the smaller size + feet are narrow = try the smaller size
- Leaning toward the larger size + feet are wide or average = try the larger size
- Unsure? The half-size up is usually safer than half-size down
Step 5 — The +1cm Rule for Safety Boots
For any safety-toe work boot (steel, composite, or nano composite), add 0.5–1cm to your measured length before selecting a size.
Why this matters:
- Toe caps occupy internal space that would otherwise be available for your toes
- Feet swell during long shifts, especially in heat or when standing
- Thick work socks compress but still add volume
- The buffer prevents your toes from hitting the inside of the toe cap
This rule is your starting point—confirm with the insole method below.
Step 6 — Verify with the “Insole Method” Toe Fit Check
The insole method is your final validation before committing to a size:
- Remove the insole from the boot
- Place it on the floor
- Stand on it with your heel at the back edge
- Look at the front: your longest toe should have roughly a thumb-width (1–1.5cm) of space before the insole ends
- Check the sides: your foot shouldn’t hang over the edges
If your foot overhangs the insole sides significantly, you need a wider width. If your toes are at or past the front edge, you need a longer size.
📋 Measurement Worksheet
Measurement Left Foot Right Foot Use Larger Heel-to-Toe Length (cm/in) Forefoot Width (cm/in) Arch Length / Heel-to-Ball (cm/in) Sock Type Worn Intended Toe Type (Steel/Composite/None) +1cm Buffer Applied? Starting Size (from chart) Notes
How Work Boots Should Fit (The Fit Checklist That Beats Guessing)
Numbers get you close, but feel confirms the fit. Use these tests every time you try on work boots.
Toe Room (Thumb-Width Test)
Your toes need space to move, spread, and absorb impact without hitting the front of the boot or toe cap.
The test: With the boot laced and your heel seated back, press your thumb on the top of the boot above your longest toe. There should be roughly a thumb-width (approximately 1–1.5cm) of space between your toe and the front of the boot.
What you’re checking:
- Toes can wiggle freely
- Toes don’t touch the toe cap when walking or going downhill
- There’s room for natural toe splay under load
Too little toe room causes numbness, black toenails, and cramping. Too much creates instability.
Heel Fit (No Slippage, No Heel Lift)
The heel should feel snug and secure—not squeezed, but definitely not slipping.
Snug vs too tight:
- Snug (correct): Heel is held in place, minimal movement when walking
- Too tight: Pressure or pinching on the heel bone, restricted blood flow feeling
What minimal movement looks like: A tiny bit of lift (1–2mm) in a brand-new boot can be normal and often disappears as the boot settles. But if your heel rises noticeably with each step or slides side-to-side, that’s problem heel slip.
Ball/Arch Alignment (Your Flex Point Must Match the Boot)
This is the heel-to-ball measurement in action. The widest part of your foot (the ball) should sit at the widest part of the boot, where the boot is designed to flex.
Walking test for alignment:
- Take 10–15 steps
- Pay attention to where the boot bends
- It should bend at your foot’s natural flex point (across the ball)
Signs of poor alignment:
- Discomfort in the arch during walking
- The boot fights your foot’s natural movement
- Fatigue develops faster than expected
Pressure Points + Hot Spots (Pinch Test + Walk Test)
Before you commit, check for pressure problems that will become painful over a full shift.
Common pressure point locations:
- Sides of the foot (especially near the little toe)
- Top of the foot (instep)
- Edge of the toe cap (where protective material meets upper)
- Heel counter area (the rigid back of the boot)
Pinch test: While wearing the boot, can you pinch a small amount of material at the sides? If the upper is stretched completely taut with no give, the boot may be too narrow.
Walk test: Spend at least 5–10 minutes walking on hard surfaces if possible. Any spots that feel warm or rubbed are early warnings of blister sites.
Walk Around Test (Real Movement Check)
Standing in front of a mirror tells you almost nothing. You need to move.
Complete this test:
- Walk around the store for at least 5 minutes
- If stairs or steps are available, walk up and down them
- Try standing on your toes (checks heel lift)
- Squat or crouch if your job requires it
Pay attention to anything that shifts, rubs, or creates pressure during real movement patterns.
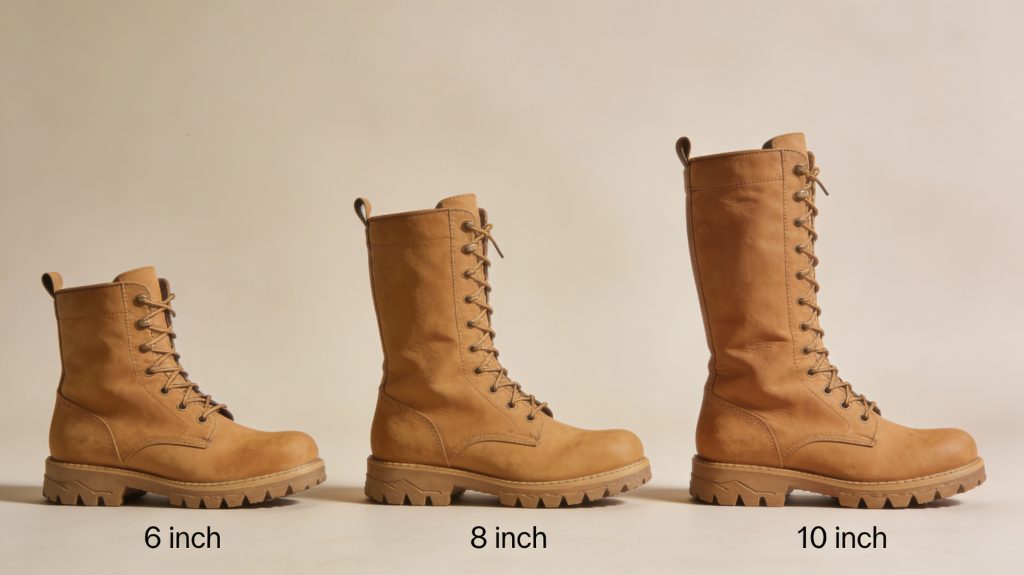
Boot Shaft Height Fit (Often Ignored)
The shaft is the part of the boot that extends up your leg. Common heights include 6″, 8″, 10″, 12″, and 14″. The right height depends on your leg length and protection needs.
How to choose:
- 6″ boots: Most versatile, least restrictive, good for general work
- 8″ boots: Added ankle support and protection, standard for many trades
- 10″+ boots: Maximum protection for logging, linework, or snake country
Common rubbing points:
- Top of the shaft rubbing against your calf or shin
- Shaft hitting the back of your knee when squatting
- Bunching at the ankle if the shaft is too tall for your leg
If a shaft height causes discomfort no matter how you lace it, try a different height rather than forcing the fit. For workers in demanding outdoor environments, our best logger boots guide covers tall-shaft options engineered for maximum protection and fit.
✅ Fit Checklist (Printable)
Before You Buy—Every Boot, Every Time:
Check Pass Fail Notes Toe room (thumb-width gap) ☐ ☐ Heel secure (no slip when walking) ☐ ☐ Ball/arch aligned with boot flex point ☐ ☐ No pressure points on sides ☐ ☐ No pressure at toe cap edge ☐ ☐ No hot spots after walk test ☐ ☐ Shaft height comfortable ☐ ☐ Insole method passed ☐ ☐ Decision: All Pass = Buy with confidence | Any Fail = Try different size/width/model
Understanding Work Boot Width Sizing (B, D, E, EE, EEE)
Length gets all the attention, but width problems cause just as much discomfort. Understanding the width system helps you troubleshoot fit issues faster.
Width Letter System Explained
Work boot widths use a letter scale. While exact measurements vary by brand, here’s the general width ladder:
| Width | Description | Common Fit |
|---|---|---|
| AAA / AA / A | Extra narrow to narrow | Less common in work boots |
| B | Narrow (standard women’s) | Narrow men’s, standard women’s |
| D | Medium/Standard (standard men’s) | Most common men’s width |
| E | Wide | Wider than standard |
| EE (2E) | Extra wide | Common wide option |
| EEE (3E) | Extra extra wide | For significantly wide feet |
| EEEE (4E) | Ultra wide | Widest commonly available |
Note: Women’s standard width is typically B, while men’s standard is typically D. This matters when converting between gendered sizing.
How to Measure Foot Width Properly
Return to your forefoot width measurement from earlier. This is the distance across the widest part of your foot—the ball area where your metatarsal joints create the broadest span.
Why forefoot width matters most: This is where safety toe caps sit and where your foot bears weight during push-off. If the forefoot is cramped, everything feels wrong.
Compare your measurement to the brand’s width chart. If you’re between widths, consider what problems you’re trying to solve:
- Feeling pinched? Go wider.
- Foot sliding inside the boot? Go narrower.
Half Size vs Width: Which Fixes Which Problem?
This distinction prevents wasted returns:
When a half-size helps:
- You need more toe room (length)
- Your foot measures between sizes on the length scale
- Current boots feel short but not tight on the sides
When width helps:
- Your foot feels pinched on the sides
- The top of the foot feels compressed
- Toe cap pressure is on the sides of your toes (not the tips)
- Your foot hangs over the insole edges
Key insight: The difference between a D width and an EE width in the same size can be significant—often 6–8mm of additional forefoot room. That’s sometimes more space than a half-size adds to length.
[Internal link: /work-boot-width-chart/ | Anchor: complete width sizing charts by brand]
Volume, Instep, and “High vs Low Volume Feet”
Here’s why some “correct size” boots still feel wrong: width only measures side-to-side, but your foot also has depth (how high it rises from the sole).
Volume combines width and depth. A “high-volume” foot is both wide and deep through the instep. A “low-volume” foot might be wide but flat.
Instep is the top of your foot between the ankle and toes. If you have a high instep, boots may feel tight across the top even when width and length are correct.
Signs of volume mismatch:
- Laces can’t tighten without creating pressure points
- Or laces pull all the way tight with still-sloppy fit
- Top of foot feels compressed even in “wide” boots
Some manufacturers offer “high-volume” or “low-volume” lasts in certain models—worth seeking out if volume is your issue.
📊 Width Decision Mini-Matrix
Symptom Try Width Change? Try Length Change? Other Fix Pinching on sides of foot Yes—go wider Unlikely to help Check instep/volume Toes hitting front No Yes—go longer Verify +1cm rule Toe cap pressing sides of toes Yes—go wider Maybe Try different toe type Heel slipping Maybe narrower No Lacing technique first Top of foot compressed Wider may help No High-volume last Foot slides inside boot Yes—go narrower Maybe shorter Thicker socks, lacing
Steel Toe vs Composite Toe vs Nano Composite: How Safety Toes Change Fit
The type of safety toe you choose directly impacts fit. Same size, same brand, different toe type = different internal space. Understanding how these meet ASTM F2413-24 standards while affecting fit is essential—our ASTM F2413-24 explained guide breaks down the protection ratings and their practical implications.
Steel Toe Characteristics (Fit Implications)
Steel toe caps are the traditional safety standard—strong, thin, and proven.
Fit implications:
- Steel is thin relative to its strength, so steel toe caps don’t add much bulk
- However, they do reduce internal toe box space more noticeably than you might expect
- Steel conducts temperature (cold in winter, can feel warm in summer)
- Some wearers report pressure patterns on the top and sides of toes in poorly fitted steel toes
Best for: Workers who prioritize maximum protection in a compact package and don’t have toe cramping issues.
Composite Toe Characteristics (Fit Implications)
Composite toes use materials like carbon fiber, plastic, or fiberglass instead of steel.
Fit implications:
- Composite materials are thicker than steel for equivalent protection ratings
- This can mean more bulk—which paradoxically sometimes feels roomier because of the toe box shape
- The toe cap shape varies more between composite models than steel models
- Composite is lighter and doesn’t conduct temperature
Best for: Workers who need metal-free protection (security checkpoints, electrical hazards) or prefer lighter weight.
Nano Composite Toes (Newer Fit Advantage)
Nano composite technology represents the latest evolution in safety toe construction. These toe caps use advanced materials engineered at the nano scale to achieve protection in a thinner, lighter package.
Fit advantages:
- Thinner profile than traditional composite—more internal toe room
- Lighter than steel with comparable protection
- Often allows for more natural toe box shapes
- Growing availability as of 2024–2026
Best for: Workers who experience toe cramping in traditional safety toes or want maximum internal space without sacrificing protection.
Which Should You Choose for Fit?
Decision framework:
- History of toe cramping or pressure?
- Try nano composite first (most internal space)
- Composite second
- Steel last (unless you specifically need steel’s properties)
- Applying the +1cm rule but still feeling cramped?
- Switch toe type before going up another size
- A roomier toe construction might solve the problem without making the boot too long elsewhere
- Job requirements dictate toe type?
- Use width adjustments to compensate for space loss
- EE in steel may fit like D in nano composite
📊 Safety Toe Comparison Table
Feature Steel Toe Composite Toe Nano Composite Typical Fit Feel Compact, structured Roomier but bulkier Roomiest, natural shape Relative Toe Room Less Moderate Most Weight Heaviest Lighter Lightest Common Fit Complaints Toe cramping, pressure on sides Bulky look Limited availability Sizing Approach Apply +1cm rule + consider EE width Standard +1cm rule May need less buffer Temperature Conductivity High (cold/hot transfer) Low Low Metal-Free No Yes Yes
Boot Type & Construction: Why “Same Size” Doesn’t Fit the Same
Two boots can be labeled the same size yet fit completely differently. Construction method, sole type, and design philosophy all affect how a size translates to fit. To understand how different construction elements affect fit, our work boot anatomy and construction materials guide provides detailed breakdowns.
Wedge Sole vs Heel: How Sole Geometry Changes Fit Perception
Sole construction changes how your foot sits in the boot and how “snug” or “roomy” it feels. For a deep dive into sole types and their performance characteristics, see our work boot soles explained guide.
Wedge sole boots:
- Flat sole profile with no separated heel
- Often feel more stable on flat surfaces
- Can change how weight distributes across the foot
- May feel different in length because of the sole geometry
Heeled boots:
- Traditional heel separation with defined height
- Elevates the heel, changing foot angle
- May feel tighter in the heel counter area
- Different pressure distribution than wedge soles
What to adjust first if transitioning between sole types:
- Lacing (often the fix)
- Sock thickness
- Width, if needed
- Size, as a last resort
Don’t assume you need a different size just because a new sole style feels different.
Goodyear Welt and Stiffer Builds: Break-In vs Fit Reality
Goodyear welt construction creates durable, repairable boots with a stiffer initial feel. This construction method is prized for longevity but requires understanding the difference between break-in and bad fit.
What settles during break-in:
- Leather uppers can soften and mold slightly to foot shape
- Footbed (if leather) will compress and conform
- Overall boot becomes more flexible at flex points
What doesn’t change:
- The last shape (fundamental boot geometry)
- Toe box dimensions
- Width (leather stretches minimally, not significantly)
Critical rule: Don’t buy tight expecting significant stretch. If a Goodyear welt boot feels painfully tight when new, it’s likely the wrong size—not just stiff. Stiffer builds settle in; they don’t transform.
Athletic-Inspired Work Boots (Sneaker-like Trend) vs Traditional Boots
The work boot market increasingly includes “athletic-inspired” options designed to feel more like sneakers from day one. If this style appeals to you, our best lightweight work boots roundup covers top options that prioritize comfort without sacrificing protection.
Why sneaker sizing intuition fails:
- Athletic work boots use different lasts (foot forms) than traditional boots
- They may be designed for closer, more flexible fit
- Sizing numbers don’t transfer directly from your running shoes
- Construction is often lighter but less structured
Don’t assume: Your size 10 sneaker doesn’t mean you’re a size 10 in athletic-inspired work boots. Measure and test as you would for any work boot.
Insulated/Winter Work Boots
Insulation adds material inside the boot, directly reducing available volume for your foot. For cold-weather workers, our best winter work boots covers insulated options with fit considerations.
Sizing approach for insulated boots:
- Expect to need more room than non-insulated versions
- Heavy insulation (400g+) may require a half size up or wider width
- Test with your winter socks specifically
Seasonal sizing plan:
- If you alternate between insulated and non-insulated boots, you may genuinely need different sizes
- Keep thicker wool or thermal socks in mind when testing winter boots
- Remember feet still swell, even in cold weather
Work Boot Sizing by Brand (How to Handle Brand-to-Brand Variation)
Here’s the frustrating truth: your size in one brand often isn’t your size in another. Understanding why helps you adapt.
Why Brand Sizing Differs (The Boot Last Explained)
A boot last is the three-dimensional form around which a boot is built. It determines the boot’s fundamental shape: toe box volume, arch placement, heel width, instep height, and overall proportions.
Every manufacturer uses their own last designs. Even within a single brand, different product lines may use different lasts.
What this means for you:
- Size 10 from Brand A is built on a different shape than size 10 from Brand B
- You may be a D width in one brand and need EE in another
- Switching models within a brand can also change fit
The last is the single biggest factor in why sizing varies between brands.
Brands Commonly Reported to Run Large (Verify With Current Guides)
Based on commonly reported feedback, some brands tend to run larger than typical sizing:
- Red Wing: Commonly reported to run about a half size large; many wearers size down from their Brannock measurement. If you’re considering Red Wing Heritage boots, our Red Wing boots warranty covers what to expect from the brand’s customer service if you need exchanges.
- Nicks: Commonly reported to run large; the brand provides detailed measurement guidance for this reason
Critical note: These are general reports from the work boot community. Specific models may vary, and brands update their lasts and sizing over time. Always verify with the brand’s current sizing guide before purchasing.
Brands Reported True-to-Size (TTS) vs Variable Lines
Some brands are commonly reported as more consistent with Brannock measurements:
- These brands often recommend starting with your measured size
- But even TTS brands may have model-specific variations
Framework for TTS brands:
- Measure your feet accurately
- Check the specific model’s reviews for fit reports
- Use the brand’s current size chart
- Apply the +1cm rule for safety toes
Critical Brand Exception: When Half Sizes Add Width Only (Not Length)
Several work boot brands—particularly those with Australian or UK heritage—construct their half sizes differently:
Commonly reported examples:
- Steel Blue: Half sizes reportedly add width/volume rather than length
- Blundstone: Similar half-size behavior commonly reported
- Mongrel: Half sizes may increase width without length change
- Oliver: Similar construction approach reported
What this changes:
- “Half size up for toe room” won’t work as expected
- If you need more length, you may need to jump a full size
- If you need more width but same length, the half size might be perfect
Always verify this behavior with current brand sizing information before purchasing.
Which Brands Are Most Consistent Across Product Lines?
Some brands maintain more consistency across their product families than others.
What to look for:
- Brands that explicitly state they use the same last across multiple lines
- Product family names that indicate shared construction (e.g., “Heritage” line vs “Work Pro” line)
- Sizing guides that acknowledge which models share fits
Evidence to seek:
- Brand sizing pages that group models by last or fit type
- Retailer notes indicating “fits like Model X”
- Community forums discussing model-to-model consistency
📊 Brand Sizing Notes Table Template
Use this to track your research before buying:
Brand Runs Large/Small/TTS Half-Size Behavior Toe Type Notes Verification Date Length / Width / Both Always verify with current brand sizing guides—this information can change.
Women’s Work Boot Fit & Sizing (Not Just “Shrink It and Pink It”)
Women’s feet aren’t simply smaller men’s feet. Proper women’s work boot fit requires understanding the actual anatomical differences and how the industry is (finally) addressing them. For our curated recommendations, see the best women’s work boots.
Women-to-Men Size Conversion (Rule of Thumb)
When women need to shop in men’s work boot offerings—still common due to limited women’s selections in some categories—a typical conversion applies:
General conversion framework:
- Women’s sizes typically run about 1.5 to 2 sizes larger in number than men’s
- Example: A women’s size 8 often converts to approximately a men’s size 6 or 6.5
But this is a starting point, not a guarantee:
- Width is usually narrower (women’s B ≈ men’s narrow)
- Volume and heel shape differ
- Always try on when possible
Women-Specific Fit Issues (Width, Heel, Volume)
Women’s feet typically differ from men’s in several ways that affect work boot fit:
Common fit challenges:
- Narrower heel: Men’s boots often have wider heel counters, causing slippage
- Different width proportion: Ball of foot may need width while heel stays narrow
- Lower volume: Men’s boots may feel too deep or roomy even in correct length
- Arch position: May differ in placement
Encouraging development: Women-specific work boot design is accelerating, with more brands engineering women’s lasts rather than simply scaling down men’s patterns. This is a notable freshness trend in 2024–2026.
Foot Size Changes Over Time (Including Post-Pregnancy Permanence)
Feet change throughout life, and several factors particularly affect women’s sizing:
Pregnancy can cause permanent size changes. The relaxin hormone loosens ligaments throughout the body, including in the feet, often resulting in feet that are longer and wider—and they may stay that way. This isn’t temporary swelling; it’s structural change.
Other factors that change foot size over time:
- Age-related changes (feet often lengthen and widen)
- Weight changes
- Activity level changes
Recommendation: Remeasure your feet at least annually, and definitely before purchasing new work boots after major life changes.
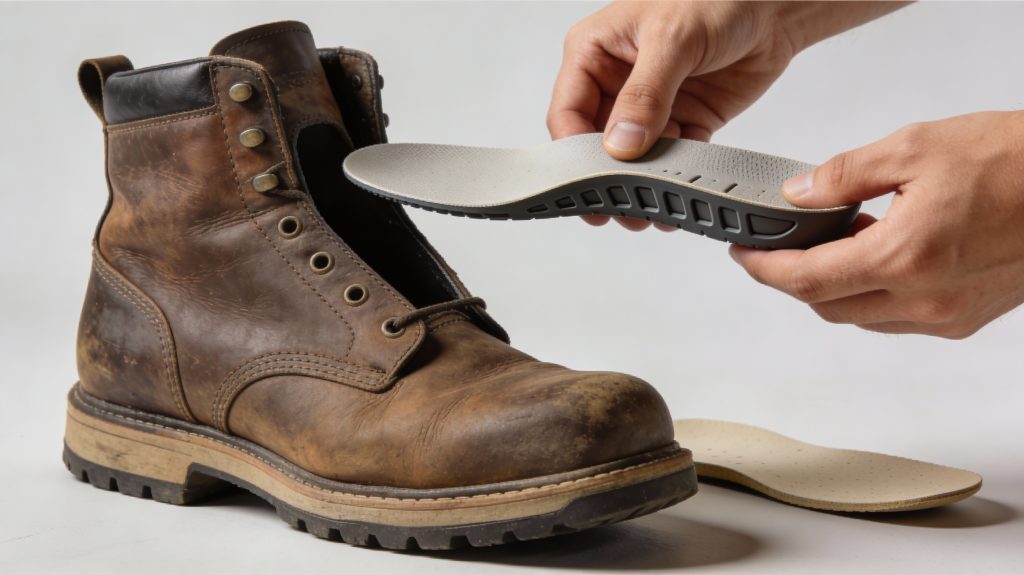
Insoles, Orthotics, and Footbeds: Getting the Right Support Without Ruining Fit
Custom support can transform work boot comfort, but it adds complexity to fit. Here’s how to navigate it. Workers seeking maximum comfort should also check our most comfortable work boots for boots with superior built-in footbeds.
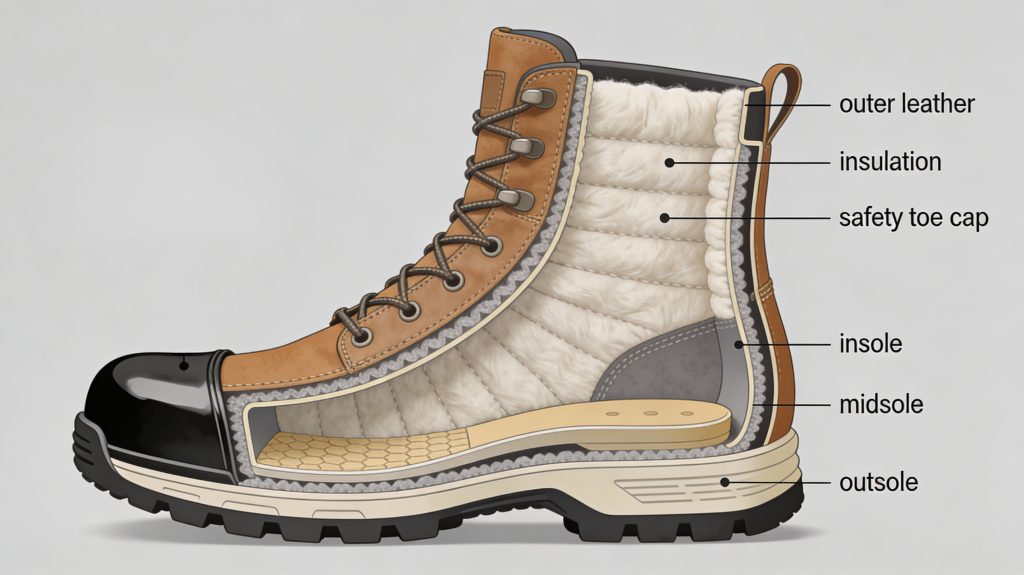
Insole vs Midsole vs Outsole (Quick Clarity)
Understanding boot layer terminology prevents confusion:
- Insole (footbed): The removable layer your foot directly stands on; can be replaced
- Midsole: The cushioning layer between insole and outsole; part of boot construction; not removable
- Outsole: The bottom layer that contacts the ground; provides traction
For fit purposes: You can change the insole. You cannot change the midsole or outsole.
When You Should Add Insoles (Arch Pain, Fatigue, Alignment)
Consider aftermarket insoles or orthotics if you experience:
- Arch fatigue or discomfort during or after shifts
- General foot fatigue beyond normal tiredness
- Alignment-related discomfort in knees, hips, or back
- Need for specific support your boots don’t provide
Common insole/orthotic brands in the work boot space include Superfeet, SOLE, Powerstep, and custom prescription orthotics from podiatrists.
Removable vs Built-In Insoles (Compatibility)
Not all work boots have easily removable insoles. Before buying with orthotic use in mind:
- Check if the factory insole removes cleanly
- Note the depth available (will your orthotic fit without crowding toes?)
- Some “built-in” footbeds can still be removed but may void warranty
Why removable matters: If you use custom orthotics, you need to replace the factory insole entirely. Built-in, glued-down footbeds make this difficult or impossible.
The Hard Case: Custom Orthotics + Safety Toe Caps
This combination creates the toughest fit challenge: orthotics need depth, while safety toe caps steal space.
The problem: Orthotics add volume from below, pushing your foot upward. Toe caps reduce space from above and in front. The result: toe cramping even in “correct” sizes.
Step plan for orthotics + safety toe:
- Choose boot depth/volume first—look for high-volume or accommodative models
- Then select toe type—nano composite may preserve the most space
- Then address width—orthotics can effectively narrow available width
- Final sizing—may need a half to full size larger than usual
Test the exact orthotic you’ll use during the fitting process.
🔀 Orthotics + Safety Toe Decision Tree
Start Here: Do you use custom orthotics?
No → Follow standard safety toe fitting guidance (+1cm rule, width check)
Yes ↓
Step 1: Does the boot have a removable insole?
- No → Find a different boot model
- Yes → Continue
Step 2: Is the boot available in high-volume or deep toe box options?
- Seek these out actively
- Avoid shallow, low-volume models
Step 3: Which toe type offers most internal space?
- Try nano composite first (most room)
- Composite second
- Steel last (least room above orthotic)
Step 4: Width adjustment needed?
- Orthotics effectively narrow the boot
- Go wider than your non-orthotic width (often +1 width letter)
Step 5: Size up if needed
- Test with actual orthotic inserted
- Apply insole method with your orthotic, not factory insole
Common Work Boot Fit Problems (Troubleshooting by Symptom)
When fit isn’t right, systematically troubleshoot before giving up on a boot. For a comprehensive troubleshooting resource, our complete work boot problems guide covers causes and solutions for every common issue.
Heel Slipping / Heel Lift
Heel slip is one of the most common and frustrating fit issues. Your heel lifts out of the heel cup with each step.
Fix order:
- Lacing technique (first attempt)—try heel lock lacing (also called runner’s loop or lace lock): create a loop with the top eyelets and thread laces through the opposite loop before tying. This anchors the heel.
- Alternative lacing patterns—try 2-1-3 or 3-1-2 patterns, or skip lacing through the instep eyelets to allow tighter heel locking without top-of-foot pressure.
- Width check—boots too wide allow heel movement. Try a narrower width.
- Size check—if heel still slips after lacing and width changes, boots may be too long.
- Different last—some heel counter shapes simply don’t match some heel shapes. Different brand or model may solve it.
Toe Cramping / Numb Toes
Toes feel compressed, cramped, or go numb during wear.
Troubleshooting:
- Check width first—toe cramping is often a width problem, not length. Go wider.
- Check toe type—switch from steel to composite or nano composite for more space.
- Insole method re-check—verify your foot isn’t overhanging the insole sides.
- Toe room test—ensure you have thumb-width space to the front.
- Sock thickness—thick socks may push you into cramped territory; try thinner or adjust size accordingly.
Arch Pain / Plantar Fasciitis Signals
Discomfort through the arch during or after wearing boots.
Considerations (not medical advice):
- Heel-to-ball alignment—if the boot’s flex point doesn’t match your arch, every step creates strain. Re-check arch length sizing.
- Insole/orthotic support—stock insoles often provide minimal arch support. Consider aftermarket options.
- Lacing adjustment—overly tight lacing through the midfoot can affect arch comfort.
If arch pain persists despite fit adjustments, consult a medical professional.
Blisters / Hot Spots / Ankle Rubbing
Friction-related problems indicate rubbing that shouldn’t happen.
Diagnosis and fixes:
- Hot spot location determines cause:
- Heel: lacing too loose, boot too big, or heel counter mismatch
- Sides: too narrow, pressure points
- Top of toes: too shallow or toe cap edge rubbing
- Ankle: shaft height issue
- Sock adjustments—moisture-wicking socks reduce friction; doubled liner socks can help.
- Lacing patterns—can reduce pressure at specific spots.
- Shaft height—ankle rubbing from the shaft top often requires different boot height, not fit adjustments.
Black Toenails
Toenails that bruise and turn black indicate repeated impact with the toe cap or front of the boot.
Almost always a length/toe room issue:
- Boots are too short, or
- Heel is sliding forward, pushing toes into the toe cap
Fix:
- Verify adequate toe room (thumb-width test)
- Check heel security (heel lock lacing)
- If both pass but black toenails persist, try longer size
- Verify proper lacing through midfoot anchors the foot
📊 Problem → Likely Cause → Best Fix Matrix
Problem Likely Cause Best Fix Heel slipping Too wide; lacing loose; heel counter mismatch Heel lock lacing → narrower width → different last Toe cramping Too narrow; wrong toe type Wider width → composite/nano composite toe Numb toes Too narrow; too short; lacing too tight Width increase → length check → lacing adjustment Arch pain Flex point mismatch; inadequate support Check arch length → supportive insole Blisters on heel Heel slip; too large Heel lock lacing → smaller size or narrower width Blisters on sides Too narrow Wider width Ankle rubbing Shaft height mismatch Different shaft height Black toenails Toe room insufficient; heel sliding Verify length + heel security Top of foot pressure Too shallow; low volume; lacing Skip-lace instep → high-volume model
Breaking In Your Work Boots (Without Destroying Your Feet)
Even properly fitted boots need some settling time. Here’s how to break them in without breaking your feet. Our complete break-in guide covers accelerated methods that protect your feet.
How Long Does Break-In Take?
General framework: Most quality work boots settle in within 1–2 weeks of regular wear. Goodyear welt and heavier leather constructions may take longer. Lighter, athletic-inspired boots often feel comfortable almost immediately.
Important distinction: Break-in means the boot settles and conforms. It doesn’t mean stretches from tight to comfortable. If boots cause significant pain, they’re likely the wrong size.
Step-by-Step Break-In Process
Week 1:
- Day 1–2: Wear for 1–2 hours around the house
- Day 3–4: Wear for 3–4 hours (short errands, light activity)
- Day 5–7: Half-day wear, gradually extending
Week 2:
- Extend to full shifts if no major discomfort
- Continue monitoring for hot spots
- Adjust lacing as leather settles
Throughout:
- Remove boots and check feet for red spots
- Address any developing hot spots immediately (adjust lacing, add padding)
- Don’t push through significant pain
Break-In Tips That Actually Help
Sock strategy: Start with slightly thicker socks than you’ll ultimately use, then transition to normal work socks as boots loosen.
Lacing micro-adjustments: Re-lace throughout the day as needed. Leather stretches slightly as it warms up; you may need to tighten.
Leather conditioning: For leather uppers, applying conditioner (per manufacturer recommendations) can soften leather and accelerate the molding process. Don’t over-apply.
Move naturally: Walk, bend, climb stairs—real movement helps the boot flex points develop.
What NOT to Do
Avoid these common shortcuts:
- Water submersion: Soaking boots to “speed up” break-in damages leather, adhesives, and construction. Don’t do it.
- Extreme heat: Hair dryers, radiators, and direct sunlight can crack leather and degrade materials.
- Full shifts immediately: Jumping to 10-hour days with new boots guarantees blisters.
- Ignoring pain: Pain isn’t “toughening up”—it’s a warning.
The Anti-Myth Reminder
Here’s the rule that separates good advice from bad:
Leather uppers may stretch and mold slightly. The toe box does not meaningfully stretch.
If your toes are jammed against the toe cap on day one, break-in won’t fix it. The toe box is reinforced (especially in safety toe boots); its dimensions are essentially permanent.
The modern standard: fit should be correct when you buy the boot. Break-in settles materials and customizes flex points. It doesn’t transform wrong sizes into right ones.
Avoid These Common Sizing Mistakes (And Internet Misinformation)
Learn from others’ expensive mistakes.
The Most Common Errors
Measuring only one foot Most people have asymmetrical feet. Always measure both and size for the larger one.
Measuring in the morning Feet expand throughout the day. Morning measurements don’t capture your working-hour foot size.
Using sneaker size as boot size Sneakers and work boots use different lasts, different construction, and sometimes different sizing scales entirely. Your running shoe size means nothing for boot selection.
Ignoring width and volume Length is only one dimension. More people have width issues than length issues but focus exclusively on length.
“Size Down Two Full Sizes” Is Often Dangerous Advice
You’ll encounter advice online claiming certain brands require sizing down 2 full sizes from your measured size. This advice circulates because:
- Some conversions between measurement systems get mangled
- Echo chambers repeat bad advice without verification
- Individual outlier experiences get generalized
The danger: Buying boots 2 sizes too small causes immediate damage—cramped toes, pressure sores, black toenails, altered gait.
Safer approach:
- Measure your feet accurately (both feet, later in day, with work socks)
- Calculate arch length, not just total length
- Apply the +1cm rule for safety toes
- Verify with the insole method
- Consult the brand’s current sizing guide directly
Feet Change With Age—Remeasure Regularly
Your work boot size isn’t fixed for life.
Feet change due to:
- Natural aging (ligaments loosen, feet lengthen and widen)
- Weight changes
- Pregnancy (often permanent changes)
- Activity changes
- Injuries
Recommendation: Remeasure your feet at least once per year and always before buying new work boots. Treat old measurements as expired data.
The Real Cost of Wrong Work Boot Sizing
Ill-fitting boots cost more than discomfort.
Cost Breakdown (Practical, Not Theoretical)
Financial costs:
- Replacement churn: Boots that don’t fit get returned or abandoned, wasting purchase price and time
- Wasted purchases: Wrong-fit boots in the back of the closet represent pure waste
- Productivity drag: Discomfort slows you down, costs focus, reduces quality of work
- Missed work time: Severe fit problems can cause injuries requiring time off
Compounding effect: Workers who give up on good fit often cycle through cheap boots quickly, spending more over time than one well-fitted quality pair would cost.
Biomechanical Consequences of Too-Small vs Too-Large
Too-small boots:
- Constant pressure on toes leads to nerve compression, pain, and potential injury
- Altered gait as you unconsciously compensate for discomfort
- Restricted circulation in severe cases
- Accelerated fatigue
Too-large boots:
- Instability increases injury risk on uneven surfaces
- Friction from foot sliding inside creates blisters and hot spots
- Compensation patterns strain other body parts (ankles, knees, hips)
- Heel lift reduces ladder and climbing safety
Neither is acceptable. Proper fit is the only cost-effective option.
💰 “Wrong Size Cost Calculator” Framework
Estimate your personal cost of poor fit:
Cost Factor Your Estimate Boots abandoned due to fit (last 2 years) × price $ Returns/exchanges shipping or time cost $ OTC pain relief purchased for foot issues $ Insoles/modifications to “make it work” $ Productivity loss estimate (hours × rate) $ Total estimated cost of poor fit $ Compare to: getting properly fitted once and buying the right size.
Online Size Charts vs In-Store Fitting vs 3D Scanning (What Actually Works Now)
Different fitting methods have different strengths. Here’s how they compare.
“Try Before You Buy” and Expert Fitting Services
The top-ranked advice across reliable sources is consistent: professional fitting is the gold standard.
Why in-store fitting matters:
- Real-time feedback on fit
- Ability to walk, move, and test
- Expert eyes catch issues you might miss
- Access to Brannock devices and multiple sizes/widths
- Immediate comparison between options
If you can, get fitted in-store for your first pair of a new brand. Once you know your size in a specific brand and last, online ordering becomes safer.
3D Foot Scanning + Stride Analysis (Freshness)
3D foot scanning technology is becoming more accessible in the work boot market. Services like Red Wing’s “Ultimate Fit Experience” use scanners to capture complete foot dimensions digitally.
What scanning may capture that tape measures miss:
- Volume mapping (not just length and width)
- Asymmetry between feet
- Pressure distribution
- Arch height and shape
- Stride and gait patterns (in advanced systems)
Emerging reality: As of 2024–2026, 3D scanning is available at some specialty retailers and brand stores, though not yet universally accessible. It represents the most complete picture of foot geometry currently available outside clinical settings.
Virtual Fitting Tools: How Reliable Are They?
Many brands now offer app-based or website-based “virtual fitting” tools.
Accuracy comparison framework:
| Method | Captures | Misses | Best Use |
|---|---|---|---|
| 3D Scanner | Volume, asymmetry, complete geometry | Expensive, limited availability | Gold standard when available |
| Brannock Device | Length, width, arch length | Volume, gait | Excellent baseline, widely available |
| At-Home Measurement | Length, width | Arch length (estimate only), volume | Acceptable starting point |
| Virtual/App Tools | Varies widely | Often limited to length/width | Confirmation, not sole input |
Best practice: Use technology as confirmation of your measurements, not as your only input. Cross-reference app results with physical measurement.
Safety Standards & Fit: What Changed (2024–2026) and Why It Matters
Safety standards evolve, and staying current protects both your feet and your compliance.
ASTM F2413-24 Is the Current Reference (Freshness Risk Control)
ASTM F2413-24 is the current American standard for protective footwear performance requirements. If you’re buying safety toe boots in the US market, this is the standard to reference. According to OSHA’s foot protection standards (29 CFR 1910.136), employers must ensure workers use protective footwear when there are dangers of foot injuries from falling or rolling objects, piercing the sole, or electrical hazards.
What this means for fit:
- Standards define protection levels, not fit
- However, meeting protection requirements affects internal boot design
- Verify the boots you’re buying meet current standards—don’t rely on outdated “ASTM F2413-18” labeling as your only reference
Keep current: Standards update periodically. ASTM F2413-24 replaced previous versions, and future updates will supersede it.
EN ISO 20345:2024 Transition (Freshness Note)
For workers in international contexts or purchasing European-origin boots, EN ISO 20345:2024 is the relevant safety footwear standard.
Transition period awareness:
- Standards transitions mean boots manufactured under previous versions may still be in supply chains
- Check labeling dates and version references
- Newer isn’t always different, but verification ensures you’re getting what you expect
Safety Toe Label Literacy (Tie to Fit)
Understanding safety labeling helps you verify you’re buying the right protection level—which affects fit.
Label elements that matter:
- Toe protection rating (I/75 for impact, C/75 for compression in ASTM)
- Toe type (steel vs composite vs nano composite—affects internal space)
- Additional hazards (electrical hazard, metatarsal, puncture resistance)
Each protection element may affect boot construction and, therefore, fit. Know what you’re buying.
🔄 Maintenance Note
Update this page annually for:
- Standards changes (ASTM, EN ISO updates)
- Brand sizing guide changes (new lasts, new models)
- BOA lacing system adoption across brands
- Nano composite developments and availability
FAQ (People Also Ask — Answered Clearly)
Should work boots be tight or loose?
Neither. Work boots should be snug but not tight. Your heel should feel secure without slipping. Your toes should have wiggle room (thumb-width to the front) without hitting the toe cap. The sides should hold your foot without pinching. “Tight” causes pressure injuries and circulation problems. “Loose” causes instability and friction blisters.
Should you size up or down in work boots?
Start with your accurately measured size, then adjust based on fit testing. For safety toe boots, the +1cm rule often means sizing up from your base measurement. But “up” vs “down” depends on the brand’s sizing behavior and your specific foot—measure, apply the rule, and verify with the insole method.
How do you know if work boots fit properly?
Use the complete fit checklist: thumb-width toe room, secure heel with no heel slip, flex point alignment at the ball of your foot, no pressure points on sides or top, comfortable walk test, and insole method verification. All criteria should pass.
How much room should be in the toe of a work boot?
Approximately one thumb-width (1–1.5cm) between your longest toe and the front of the boot. This allows toe wiggle, accommodates swelling, and prevents impact with the toe cap when walking or descending.
Do work boots stretch over time?
Leather uppers can soften and mold slightly to your foot shape. However, the toe box does not meaningfully stretch, especially in safety toe boots. Don’t buy tight expecting stretch—fit should be correct on day one.
Should I buy steel toe boots a half size bigger?
Apply the +1cm rule rather than automatically going a half size up. Measure accurately, add the 0.5–1cm buffer, then determine if that results in a half size increase. Also verify whether that brand’s half sizes add length or only width—if width-only, you may need a full size up for more toe room.
What is the difference between D and EE width in work boots?
D is standard/medium width for men’s boots. EE (also written 2E) is wide. The actual measurement difference between D and EE in the same size is often 6–8mm of additional forefoot width—a significant amount that can solve side-pinching issues without changing length.
How long does it take to break in work boots?
Most quality work boots settle in within 1–2 weeks of regular wear. Heavier, stiffer constructions (like Goodyear welt boots) may take longer. Break-in settles materials; it doesn’t transform wrong sizes into right ones.
How do you stop heel slippage in work boots?
Try heel lock lacing first: create loops through the top eyelets and thread laces through the opposite loops before tying. If that doesn’t work, check if boots are too wide (try narrower width) or too long (try shorter length). Some heel shapes simply don’t match some boot heel counters—different model or brand may be necessary.
Can you wear work boots without breaking them in?
Modern quality work boots are designed to be comfortable from day one. If boots cause significant pain out of the box, they’re likely the wrong size, not just “unbroken.” Lighter, athletic-inspired work boots often need minimal break-in. Heavier constructions benefit from gradual wear, but shouldn’t cause suffering.
What size women’s work boot equals men’s size?
The typical conversion is roughly 1.5–2 sizes difference: a women’s size 8 often converts to approximately a men’s size 6 or 6.5. However, width and volume differ between men’s and women’s boots, so always try on and verify rather than relying solely on number conversion.
Are composite toe boots roomier than steel toe?
Composite toe materials are thicker than steel, but the toe box shape varies between models—some composites feel roomier, some feel bulkier. Nano composite toes typically offer the most internal room due to their thinner profile. Test specific models rather than assuming toe type determines roominess.
How often should you measure your feet for work boots?
At least once per year, and always before purchasing new boots. Feet change with age, weight changes, pregnancy, and other factors. Treat measurements older than a year as potentially outdated.
Do you need special insoles for work boots?
Many workers benefit from aftermarket insoles that provide better arch support, cushioning, or alignment than stock footbeds. If you experience arch fatigue, foot pain, or use orthotics, consider upgraded insoles—but ensure the boot has adequate depth to accommodate them without crowding toes.
Why are my work boots different sizes than my sneakers?
Sneakers and work boots use different lasts (foot forms), different construction methods, and sometimes different sizing scales. They’re built for different purposes. Your sneaker size provides no reliable information about your work boot size—measure specifically for boots.
Glossary
Brannock device: The metal foot-measuring tool used in shoe stores that captures length, width, and arch length measurements. Named after its inventor, Charles Brannock.
Boot last: The three-dimensional form around which a boot is built. Determines the fundamental shape, including toe box volume, width, heel shape, and arch placement. Different lasts = different fits, even in the same size.
Heel-to-toe length: Total foot length from the back of the heel to the tip of the longest toe. The most commonly measured dimension, but not the only important one.
Heel-to-ball length (arch length): The distance from the back of the heel to the ball of the foot (the widest part where the foot naturally bends). More important than total length for proper boot flex alignment.
Toe box: The front portion of the boot that contains and protects the toes. Shape and volume vary significantly between models.
Toe cap: The protective reinforcement at the front of a safety boot. May be steel, composite, or nano composite.
Flex point: The location in a boot designed to bend during walking. Should align with the ball of the foot where the foot naturally flexes.
Heel slip: Unwanted lifting of the heel out of the boot’s heel cup during walking. A common fit problem indicating the boot is too loose, too wide, or poorly shaped for the wearer’s heel.
Heel counter: The rigid material at the back of the boot that wraps around the heel, providing structure and support.
Pressure points: Locations where the boot creates concentrated force against the foot, leading to discomfort, pain, or blisters.
Volume: The three-dimensional space inside a boot, combining length, width, and depth. A “high-volume” foot is both wide and deep through the instep.
Instep: The top of the foot between the ankle and toes. High instep = more height needed in the boot’s midfoot area.
Overpronation/Supination: Gait patterns where the foot rolls inward (overpronation) or outward (supination) beyond normal range during walking. Can affect boot wear patterns and comfort.
Goodyear welt: A construction method that stitches the upper to a welt strip, which is then stitched to the outsole. Creates durable, resoleable boots with a stiffer initial feel.
Insole (footbed): The removable layer inside the boot that the foot rests on. Can be replaced with aftermarket or custom orthotics.
Midsole: The cushioning layer between the insole and outsole. Part of the boot’s construction; not removable.
Outsole: The bottom layer of the boot that contacts the ground. Provides traction and durability.
Shaft: The portion of the boot that extends up the leg above the ankle. Common heights include 6″, 8″, 10″, 12″, and 14″.
Aglet: The small plastic or metal tip on the end of bootlaces that prevents fraying and aids threading through eyelets.
BOA lacing system: A dial-based closure system using steel cables instead of traditional laces. Provides quick, micro-adjustable tightening. Increasingly adopted in work boot designs as of 2024–2026.
True to size (TTS): A boot that fits according to standard Brannock measurements without significant sizing adjustment needed.
[IMAGE: work-boot-anatomy-diagram.jpg | Alt: Labeled diagram showing parts of a work boot including toe cap, shaft, heel counter, and outsole | Caption: Understanding boot anatomy helps you communicate fit issues and make better purchasing decisions.]
Recommended Visual/Interactive Modules
This guide includes the following tools for reference and printing:
✅ Measurement worksheet table — Record all measurements in one place
✅ Fit checklist (printable) — Pass/fail verification before purchase
✅ Width decision mini-matrix — Symptom-to-solution guide
✅ Steel vs composite vs nano composite comparison table — Fit implications by toe type
✅ Problem/solution troubleshooting matrix — Quick-reference for common issues
✅ Orthotics + safety toe decision tree — Navigate the toughest fit challenge
✅ Brand sizing notes table template — Track your research with verification dates
✅ “Wrong size cost calculator” box — Estimate the financial impact of poor fit
Freshness & Update Protocol (Editor Notes)
For content maintainers:
- Re-verify ASTM F2413-24 references annually; update when new standards release
- Monitor brand sizing guide changes, especially when brands introduce new lasts or models
- Track BOA lacing system adoption across work boot brands
- Follow nano composite toe developments and availability expansion
- If market statistics are added, re-verify every 6–12 months (high decay risk)
- Check women’s work boot innovation developments annually (accelerating market segment)
Last reviewed: January, 2026
Try these steps before you buy. Proper fit is the foundation of work boot performance—get it right and your boots become an asset instead of an obstacle. If possible, get fitted in-store for your first pair with any new brand, and use this guide to verify the fit makes sense before you commit.
For personalized recommendations based on your trade, check our best work boots guide which covers top picks across every category, or explore our work boots by job type guide for occupation-specific recommendations.